Quit buggin' me!

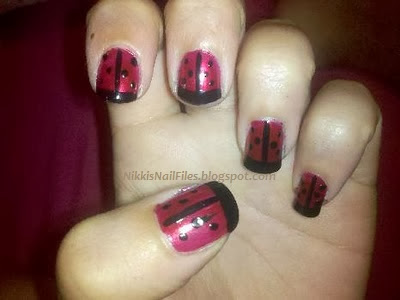
For the past week and a half I've been noticing a lot of ladybugs around. I've seen them outside on my car windows and sunroof, residing on the vanity mirror in my bathroom, and even relaxing on my walls in my bedroom. Normally, people would just capture them and put them back outside. In my family, however, we have a special meaning for lady bugs. Ever since I was eight my mom always said how ladybugs are signs from my mommom. Since they've apparently been around right and left here with my family, I decided they'd be a perfect end of the summer nail design. Sorry they're a little sloppy (especially the thumb nail)!


For this look: I used Ulta Professionals Cocktail Waitress as the base, Orly Liquid Vinyl for the black tip and dots, and  Kiss Brush-On Nail Art Paint in Black to divide the ladybugs' wings.

I thought these were so cute (yes I did them on my toes too! lol) but after work today they were all chipped and messed up. :( I guess that's what I get for not putting a top coat on and expecting them to live through a 7 hour breakfast shift at the diner. Oops!


What do you think? Let me know in the comments below :)

Hey to the family in CA!

These nails are actually inspired by something I saw on my Aunt Les' blog the other day. I wanted to show her what I've been working on (this new blog) and decided a design done especially for her was a pretty cool idea. As I was perusing her blog pictures of some of her creations and finds, I settled on this vintage fabric as inspiration for my next nail design. I tried my best to make it look like the fabric (did I mention I wasn't an artist?) but I'm not sure it worked out. Eh, either way it was fun trying!


By the way, you can check out her blog here.

I used China Glaze White on White as the base for all fingers. For the design on each I used:
Index - Wet'n'Wild 423B, China Glaze Awaken
Middle - Orly Liquid Vinyl and Kiss Brush-On Nail Art Paint in Black 
Ring - China Glaze Coconut Kiss, Wet'n'Wild 423B, Kiss Brush-On Nail Art Paint in Black 
Pinky - Kiss Brush-On Nail Art Paint in Black and China Glaze Shower Together 
Thumb - Kiss Brush-On Nail Art Paint in Black, China Glaze Shower Together, China Glaze Coconut Kiss, and Wet'n'Wild 423B

Also, a CHALLENGE! I've now purchased way WAY too many nail polishes. The workers at Beautyland (my discount nail polish heaven) probably have my picture on the wall with "Do not sell to" written below. I'm cutting myself off. NO MORE nail polishes until I've used EACH one as a base for a nail design. Hm, I wonder how long this will take...

Oh yeah and before I go...a little message for my family in California!

I miss you guys!! Hope you're enjoying your summer!

Tie Up the Loose Ends

Happy Monday! Since I leave for school in about two weeks I've started to tie up all the loose ends here and get everything together for my junior year. I can't believe how fast time moves--I'm a junior in college already. Anyway, tying up loose ends is what inspired my current nails. They kind of look like corsets or shoe laces-whichever. I think they came out really well though!
corset manicure
For this look I used China Glaze Eyes Like Sapphires for the base coat, China Glaze Moody Blue for the center line, and China Glaze White on White for the grommets. Then, for the laces I used Essence Silver Surfer on the ring fingers and Kiss Brush-On Nail Art in black for the other 8 fingers.

So what do you think of the corset design? Would you sport it on your fingernails?
Let me know in the comments below :)

Hey Jude....come check out my nails!

Tonight I'm going to see Paul McCartney in concert with my super awesome boyfriend and I'm so excited! I wanted to do a manicure that would fit the occasion so I started brainstorming. To my surprise, boyfriend offered this wonderful idea: piano keys. How did I not think of that? Of course, with it being piano keys, I tried to make the lines as straight as possible...and compared to my usual "straight lines" these are pretty darn straight.
Manicure with piano keys; piano key manicure; piano key nails
As always, I started off with a base coat of Orly Bonder. I followed that with three coats of China Glaze White on White (does anyone else use a lot of coats when they use white?) and Kiss Brush-On Nail Art Paint in black for the (only semi-crooked ;-) ) lines of the piano keys. I finished off with a blue accent line (Color Club Art Club in Sky Blue) and two coats of China Glaze Patent Leather Top Coat. I don't think it was the result I was looking for...but...it's growing on me and it was still fun to try :)

Oh yeah! And I got new nail polishes with my sister yesterday! Orly Catch the Bouquet, China Glaze Heart of Africa and Secret Peri-Wink-Le, and Love & Beauty Dark Purple :D Hooray for new colors to play with!

Flower Powered Fuschia

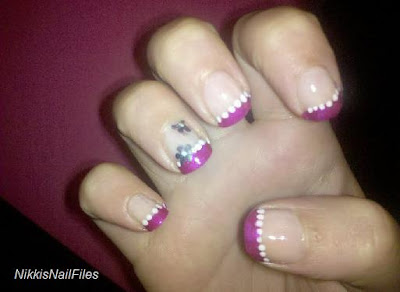
My second nail blog post! I chose to do a combined french/flower design today because I bought OPI Flashbulb Fuschia at Ulta with my sister and I really wanted to use it. So, here it is!
fuschia manicure; pink nails with white flowers;
For this look I used Orly Bonder as a base coat and Sally Hansen Maximum Growth Nourishing Nail Color over it. I then painted the tips with OPI Flashbulb Fuschia and dotted a divider line with Kiss Brush On Nail Art Paint (in white). The flowers were created using China Glaze Awaken with the same white used for the line dotted to be the center of each flower. I finished the design off with Orly Won't Chip.

How do you like it? Let me know in a comment below!

I Wanna Polka...

Hello all! Welcome to my new blog: Nikki's Nail Files! I hope you enjoy what's to come (designs, swatches, posts, etc.) and will check back often and offer comments and ideas :)

polka dot manicure; polka dot tips; polka dot nail design; nail designs with multicolor polka dots

I love polka dots. I think they're so cute and playful and they happened to be how my nails were designed when I created this blog so I decided to use them as my very first blog entry!

Get this look: I started with a base coat of Orly Bonder and then followed with two coats of Sally Hansen Maximum Growth Nourishing Nail Color on each nail.

For the tips I used a different color on every nail:
Thumb - China Glaze Shower Together
Index - China Glaze Pink Voltage
Middle - China Glaze In The Limelight
Ring - OPI Flit A Bit
Pinky - China Glaze Solar Power

After they dried I used a Kiss Brush-On Nail Art striper in black to make a line, made a couple China Glaze White on White polka dots on each tip, and finished with a coat of Orly Won't Chip.

I thought this was so cute that I did it on my toes too!


Plus, as a bonus, these are a few designs I had tried and taken pictures of before I started this blog. I thought I had more but these three are it :(


For the top (hot pink zebra tip nails) I started with a coat of Orly Bonder. Then I applied two coats of China Glaze Limbo Bimbo. I painted a little under half the nail Orly Liquid Vinyl and used Kiss Brush-On striper in White for the zebra stripes. Of course (no mani is complete without a top coat!) I finished up with China Glaze Fast Forward Top Coat.

The single nail beach scene was something I tried that didn't really work out too well. I started with China Glaze Strong Adhesion Base Coat. The first coat of polish was China Glaze Moody Blue. I then used China Glaze Frostbite as the ocean. For the design I used Wet'n'wild 423B as the sun, China Glaze Coconut Kiss as the sunset sky, Kiss Brush-On White and China Glaze In The Limelight as the palm tree. The island was China Glaze Chocodisiac. Topped it off with a coat of China Glaze Fast Forward Top Coat.

The third is a design I did for my Mom before a zoo trip. It's my attempt at a giraffe design. I used an Orly Bonder base coat, two coats of China Glaze Chocodisiac and made the lines from Kiss Brush-On White. Nails were finished with China Glaze Fast Forward Top Coat.

What do you think? What kind of posts would you like to see on Nikki's Nail Files? 
Let me know in a comment below :)
Professional Blog Designs by pipdig